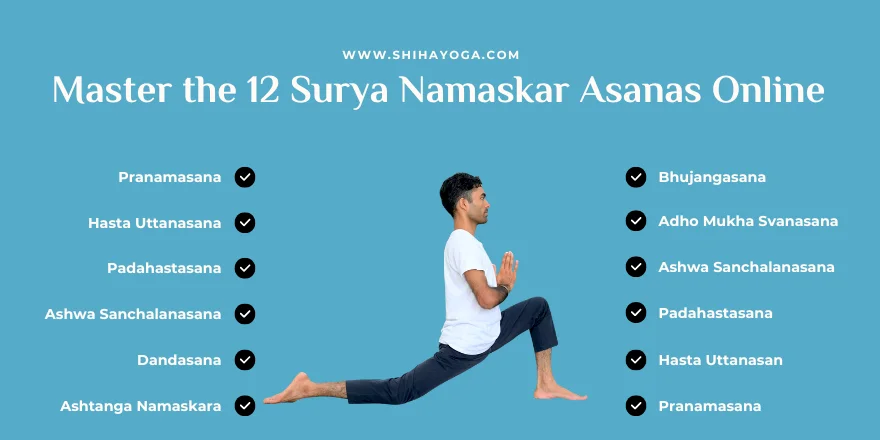
The yoga technique known as Sun Salutation (Surya Namaskar), is one of the most effective yoga poses, and involves both movement, breathing, and mindfulness. Every pose of this movement, so-called Surya Namaskar Asanas, will make you open your eyes and activate your brain and discover the inner self.
No matter how good or bad a yogi you are, you may find at least the 12 names of Surya Namaskar Asana and practice them step-by-step to become stronger, more flexible, and balanced. In this manual we are going to show you each pose, its name and its benefits in order to learn Surya Namaskar online being at the comfort of your home.
What Is Surya Namaskar?
Still, Surya Namaskar simply means Salutation to the Sun. The Sun in the ancient traditions of yogic symbolism signifies vitality, consciousness and divine energy. Doing Surya Namaskar is a gratitude to the life-giving Sun which in fact enhances the overall physical and mental well-being.
Every pose of the 12 Surya Namaskar Asanas is accompanied with deep breathing – creating a rhythm that activates blood flow, builds muscles and enhances relaxation.
Religious exercising of such asanas in Surya Namaskar will make the body lean, flexible and come to a feeling of discipline and awareness.
How Many Asanas Are There in Surya Namaskar?
Surya Namaskar consists of 12 different Asanas and these Asanas are performed in a flowing manner. The combination of them produces an ideal proportion of forward and backward bends that make the whole body vibrant.
Here’s a quick list of the 12 names of Surya Namaskar Asana:
- Pranamasana (Prayer Pose)
- Hasta Uttanasana (Raised Arms Pose)
- Padahastasana (Hand to Foot Pose)
- Ashwa Sanchalanasana (Equestrian Pose)
- Dandasana (Stick Pose)
- Ashtanga Namaskara (Salute with Eight Parts or Points)
- Bhujangasana (Cobra Pose)
- Adho Mukha Svanasana (Mountain Pose)
- Ashwa Sanchalanasana (Equestrian Pose – other leg)
- Padahastasana (Hand to Foot Pose)
- Hasta Uttanasana (Raised Arms Pose)
- Pranamasana (Prayer Pose)
All these postures of Surya Namaskar are synchronized with the inhale or exhale and the mind and body move in a perfect tandem.
Step-by-Step Guide to the 12 Surya Namaskar Asanas
Let’s explore each posture in detail with its benefits and breathing pattern.
1. Pranamasana — Prayer Pose
Breath: Normal / neutral.
How: Tada isasana (stand), keeping your feet together. Palms together at heart (Anjali mudra). Shoulders to be relaxed, spine is to be stretched, face is to be softened.
Tip: Walk the ground evenly, with both feet; get the breath relaxing the mind.
Modification: Hip width apart in case stability is difficult.
2. Hasta Uttanasana Raised Arms Pose.
Breath: Inhale.
How: Raise your arms on an inhalation overhead, cross fingers (or leave palms apart), lift the chest, slightly arch backwards (without compressing the lower back). Gaze upward or forward.
Hint: Bend along the sides of the trunk; the neck straight.
Modification: Bend knees slightly, in case hamstring or lower back is tight.
3. Padahastasana / Uttanasana Standing Forward Bend (Hand to Foot).
Breath: Exhale.
How: Bend forward on the hips. Shake palms next (or under) feet; bend head down to knees. Maintain a micro-bend on knees (where necessary).
Hint: The chest should lead to cushion the low back. Soften the neck and jaw.
Modification: Place hands on blocks; flexion of the knee.
4. Ashwa Sanchalanasana Equestrian (Low Lunge) Right Leg Back.
Breath: Inhale.
How: Lunge backwards with the right leg. Left knee bent over ankle. Places hands on the mat and raise the chest; look somewhat upwards.
Hint: Rotate the hips forward; extend the spine.
Modification: Use hands on blocks or chair to support.
5. Dandasana / Phalakasana – Plank (Stick Pose)
Breath: Hold (or maintain constant breath).
How: Step backwards with the left foot to have the body straight head to heels. Hands under shoulders. Engage core and legs.
Hint: Do not sag or flex the hips, pull navel towards spine.
Alternation: Knee plank by dropping to the mat.
6. Ashtanga Namaskara Two-limb Salutation.
Breath: Exhale.
How: have knees bend down to the mat touching it with eight points: two feet, two knees, two hands, chest and chin. Hips stay slightly lifted.
Tip: Keep elbows close to ribs. Prevent lower back collapse by propping.
Modification: When it is difficult to come down to knees, step back to knees and come down gradually.
7. Bhujangasana — Cobra Pose
Breath: Inhale.
How: Slide forward, press palms, lift palms up and in front of chest (do not lose pelvis on the mat). Elbows a bit bent and pulled in. Unzip the chest; look before/up.
Tip- Do not only use arms to raise, but also use back muscles. Shoulders should be off ears.
Modification: Do low cobra (lift slightly only) or Sphinx pose (forearms on mat).
8. Adho Mukha Svanasana -Downward Facing Dog.
Breath: Exhale.
How: Tuck toes, back hips up and in an inverted V. Press palms and heels (or face heels) and lengthen the spine.
Hint: use the feet to release hamstrings and calves; equal weight distribution.
Adjustment: Bend the knees in order to keep spine straight; place blocks under wrists.
9. Ashwa Sanchalanasana Equestrian (Low Lunge, Left Leg Back).
Breath: Inhale.
How: Starting with Down Dog, forward the right foot between hands and the left leg back, and then the other way around: in the opposite sequence, then place the left leg back (this step is dependent on the direction of the flow; make sure that both sides are worked). Lift chest, look forward/up.
Tip: Hips straight and spine straight.
Adjustment: Hands on blocks where necessary.
10. Padahastasana / Uttanasana Standing Forward Bend.
Breath: Exhale.
How: Lunge forward to bring feet together, bend forward with hips, palms next to feet or on shins.
Hack: Maintain a slight bend in knees in order to safeguard hamstrings.
Modification: Put hands on blocks; make stance a little wider in case the lower back is tight.
11. Hasta Uttanasana Raised Arms Pose.
Breath: Inhale.
How: Arms sweep along the spine upwards and slightly arch backwards and open the chest.
Hint: Do not over compress the lower back; ribs must be pulled in.
Adjustment: Shoulders Shoulder mobility is limited: maintain palms shoulder-width.
12. Pranamasana -Prayer Pose (Return to Standing)
Breath: Exhale.
How: Take palms to the heart center, stand up straight, sense the alignment of the body and the process is complete.
Hint: Before repeating the round pay some attention to breath and sensation.
Surya Namaskar Asana Names and Benefits
The poses are focused on a particular body part and also provide different health benefits. Here’s a quick overview:
| Asana Name | Primary Benefits |
| Pranamasana | Improves focus and balance |
| Hasta Uttanasana | Improves flexibility, flexes the arms. |
| Padahastasana | Stimulates the digestive system, stress reliever. |
| Ashwa Sanchalanasana | Strengthens legs, opens hips |
| Dandasana | Builds core strength |
| Ashtanga Namaskara | Tones arms and chest |
| Bhujangasana | Enhances back, enhances posture. |
| Adho Mukha Svanasana | Energizes and calms the mind |
These various asanas in Surya Namaskar provide a complete body workout, which feeds the body and the mind when performed on a daily basis.
The Science Behind Surya Namaskar
Surya Namaskar is a combination of 12 postures, 12 mantras and 12 breaths which symbolizes the 12 stages of the sun. The sequence engages all the principal muscles and triggers essential organs, enhancing enhanced metabolism and hormone balance.
It also enhances cardiovascular health, breathing efficiency, as well as emotional health.
The Surya Namaskar asanas are like a flowing meditation when they are practiced in sync with your breaths – keeping you in the moment.
Physical & Mental Benefits of Practicing Surya Namaskar
Surya Namaskar has an endless number of advantages:
Physical Benefits
- Strengthens and improves flexibility.
- Enhances back position and stability.
- Increases the digestion and metabolism.
- Strengthens muscle and aids in losing weight.
- Enhances the circulation of the blood and oxygen.
Mental Benefits
- Reduces stress and anxiety.
- Improves concentration and attention.
- Facilitates emotional stability.
- Eases sleep and activism.
Surya Namaskar for Beginners
In case this is the first time you are practicing yoga, begin slowly. Do 2-3 circuits of Surya Namaskar asanas and bring it up to 10-15 or more.
Here are some tips:
- Warm up before starting.
- Concentrate on alignment and breath.
- Be aware of your actions, do not hurry.
- Modify postures if needed.
- Attend classes under the supervision or participate in online yoga.
Such websites as Shihayoga provide online yoga classes in which you may be taught how to perform Surya Namaskar step-by-step by professional teachers.
Best Time to Practice Surya Namaskar
Best would be in the morning when there is a sunrise and you are relaxed in mind. Practicing at night is also possible, however, you must make sure that you practice on an empty stomach.
Regularity is paramount – 10 minutes of Surya Namaskar a day can be seen to significantly change the levels of energy and health condition.
The Benefits of Learning Surya Namaskar Online?
With teaching Surya Namaskar Asanas, one can learn them online and have the opportunity to find professional teachers all over the world. You can:
- Guided videos allow one to learn step-by-step.
- Practice at your own pace.
- Receive personalized feedback by teachers.
- Conserve time and retain consistency.
Shiha Yoga is an online teacher of all levels, as it allows students all over the world to learn how to master Surya Namaskar and other traditional yoga asanas with correct alignment and breathing exercises.
Relevance of Surya Namaskar in the modern times.
Surya Namaskar is not simply a sequence of yoga poses in the modern hasty world, it is a complete wellness routine. It:
- Integrates meditation, gratitude and exercise.
- Encourages discipline and awareness.
- Helps counter contemporary sedentary living.
It can change your routine, whether you need to be fit, find some peace of mind, or embark on spiritual development, this ancient yogic ritual can do so.
Frequently Asked Questions (FAQs)
1. How many asanas are there in Surya Namaskar?
Surya Namaskar consists of 12 asanas practiced as a continuous flow of transition from one asana to another. Each asana should be taken up with a particular type of breathing and attitude, which will lead to a harmonious relationship of the mind and body.
2. Can Surya Namaskar be learned by beginners?
Yes, it is possible for a beginner to take from 2 to 3 rounds of Surya Namaskar daily. This can be done by careful observation of the poses and the breathing and the slow and successive change from one pose to another.
3. What are the advantages of the practice of Surya Namaskar daily?
Flexibility is increased, the muscles are toned, digestion is increased, the energy is abundant, there is mental relaxation when done regularly.
4. What number of rounds of Surya Namaskar shall I do?
For fitness generally it is best to do from 5 to 10 rounds, while advanced yogis may well do 12 rounds or more, taking them in stages.
5. Can the practice of Surya Namaskar be learned online?It is possible! Such online courses as Shiha Yoga give personal attention to the students as to the exercise, proper construction of the classes and safe teaching.